
Step-by-Step Guide to Geothermal Heating and Cooling Installation
Imagine slashing your energy bills while simultaneously shrinking your carbon footprint. Sounds too good to be true? It's not! Geothermal heating and cooling offers a path to significant home energy savings and a more sustainable lifestyle. But how do you actually make the switch?
This comprehensive guide breaks down the geothermal heating and cooling installation process into easy-to-understand steps. We'll cover everything from initial assessment to long-term maintenance, empowering you to make informed decisions about this game-changing home energy solution. Understanding the process upfront can save you time, money, and potential headaches down the road, ensuring you reap the full benefits of geothermal technology.
Let's get started by understanding what exactly goes into a geothermal installation.
Understanding Geothermal Heating and Cooling Systems
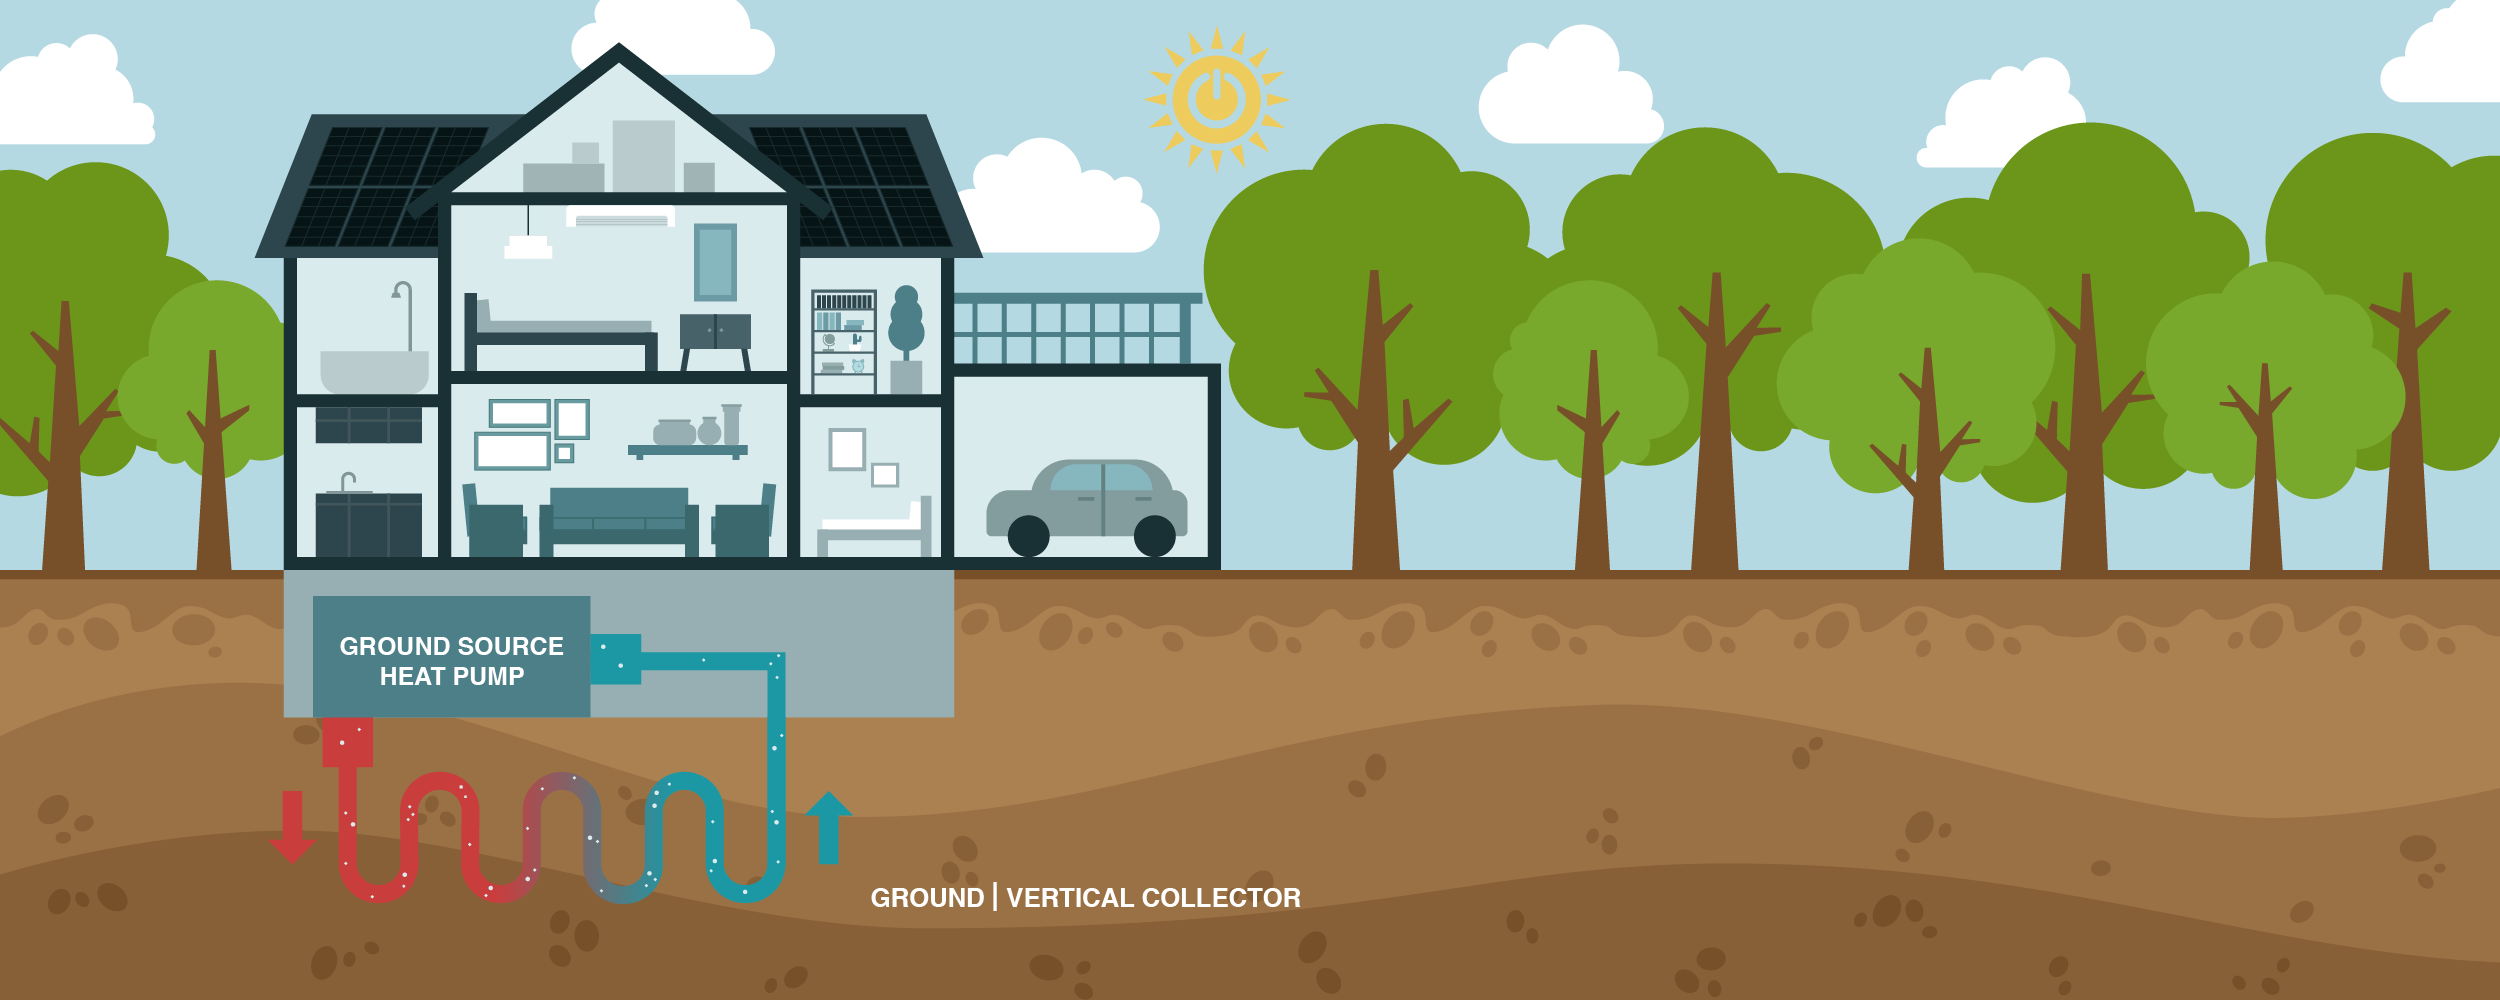
Geothermal systems leverage the earth's stable underground temperature to heat and cool your home. Unlike traditional HVAC systems that rely heavily on outside air temperature, geothermal taps into a consistent source of energy just below the surface. This translates to greater energy efficiency, reduced reliance on fossil fuels, and ultimately, lower utility bills. The process involves circulating a fluid, typically water or an antifreeze solution, through a network of underground pipes called a ground loop. This fluid absorbs heat from the earth in the winter, transferring it to your home via a geothermal heat pump. In the summer, the process is reversed, with the system pulling heat from your home and dissipating it into the cooler earth.
Types of Geothermal Systems
There are several types of geothermal systems, each with its own advantages and disadvantages depending on your property and needs: Vertical Loop Systems: These are ideal for properties with limited yard space. They involve drilling deep vertical holes (typically 100-400 feet) and inserting U-shaped pipes. Horizontal Loop Systems: These require more land area but are generally less expensive to install than vertical systems. Pipes are buried horizontally in trenches that are typically 4-8 feet deep. Pond/Lake Loop Systems: If you have a pond or lake on your property, this can be a cost-effective option. Pipes are submerged underwater, utilizing the water's relatively constant temperature. Open Loop Systems: These systems use well water as the heat exchange fluid. While efficient, they require a reliable water source and may be subject to local regulations regarding water usage and discharge.
Choosing the right type of geothermal system is a crucial first step. A qualified geothermal installer can assess your property and recommend the most suitable option.
Step-by-Step Geothermal Installation Guide
The installation process involves several key steps. Here’s a detailed breakdown to help you understand what to expect:Step 1: Site Assessment and System Design
A certified geothermal installer will conduct a thorough assessment of your property.
This includes evaluating your home's heating and cooling needs, soil conditions, available land area, and local regulations.
Based on this assessment, the installer will design a custom geothermal system tailored to your specific requirements.
Step 2: Permitting and Approvals
Obtaining the necessary permits is a critical step.
Your installer will typically handle this process, ensuring compliance with all local building codes and environmental regulations.
Permitting requirements can vary significantly depending on your location, so it’s crucial to work with an experienced installer familiar with local regulations.
Step 3: Ground Loop Installation
This is where the magic happens! The specific installation process will depend on the type of geothermal system you choose. Here’s a general overview: For Vertical Loops: A drilling rig will be used to bore vertical holes to the required depth. U-shaped pipes will then be inserted into the holes and connected. For Horizontal Loops: Trenches will be excavated to the specified depth, and pipes will be laid out in the trenches in a serpentine pattern. For Pond/Lake Loops:Pipes will be weighted down and submerged in the pond or lake, ensuring they are properly positioned and secured.
Step 4: Heat Pump Installation
The geothermal heat pump is the heart of the system.
It's typically installed indoors, often in the basement or utility room.
The heat pump is connected to the ground loop and your home's existing ductwork.
Step 5: System Testing and Commissioning
Once the installation is complete, the system will be thoroughly tested to ensure it's operating correctly.
This includes checking for leaks, verifying proper flow rates, and calibrating the heat pump.
The installer will also provide you with instructions on how to operate and maintain your new geothermal system.
Step 6: Final Inspection and Approval
A final inspection by local authorities is typically required to ensure the installation meets all code requirements.
Once the system passes inspection, you're ready to start enjoying the benefits of geothermal heating and cooling!
Factors Affecting Geothermal Installation Costs
The cost of geothermal installation can vary depending on several factors, including: System Type: Vertical loop systems are generally more expensive than horizontal loop systems. Property Size and Location: Larger properties and challenging soil conditions can increase installation costs. Heat Pump Size and Efficiency: The size and efficiency of the heat pump will impact the overall cost. Local Labor Rates: Labor costs can vary significantly depending on your location.
While the initial investment in geothermal is higher than traditional HVAC systems, the long-term energy savings and environmental benefits can make it a worthwhile investment. Many homeowners find that the reduced energy bills quickly offset the initial cost over time. Don't forget to research local, state, and federal incentives that can further reduce your upfront investment.
Understanding Return on Investment (ROI)
Calculating the ROI of a geothermal system involves comparing the initial investment with the anticipated energy savings over the system's lifespan. Factors like energy prices, climate conditions, and system efficiency all play a role. While an exact ROI calculation requires a personalized assessment, geothermal systems often offer a compelling return on investment, especially in areas with high energy costs.
Maintaining Your Geothermal System
Proper maintenance is essential to ensure the longevity and efficiency of your geothermal system.
Ground Loop Maintenance Tips
Annual Inspections: Schedule annual inspections with a qualified geothermal technician to check for leaks, corrosion, and other potential issues. Filter Replacement: Regularly replace the air filters in your heat pump to maintain proper airflow and system efficiency. Ground Loop Fluid Checks: Have the ground loop fluid checked periodically to ensure it's at the correct concentration. Vegetation Control: Keep the area around the ground loops clear of excessive vegetation to prevent root intrusion.
Heat Pump Maintenance Tips
Clean the Coils: Keep the heat pump coils clean to ensure efficient heat transfer. Lubricate Moving Parts: Lubricate the moving parts of the heat pump as needed to prevent wear and tear. Monitor System Performance:Pay attention to any changes in system performance, such as unusual noises or decreased heating/cooling capacity.
Troubleshooting Common Geothermal Issues
While geothermal systems are generally reliable, occasional issues can arise. Here are some common problems and how to troubleshoot them: Reduced Heating or Cooling Capacity: This could be due to a clogged air filter, low ground loop fluid, or a malfunctioning heat pump component. Unusual Noises: Strange noises could indicate a problem with the heat pump's motor, compressor, or fan. System Not Turning On:This could be due to a tripped circuit breaker, a faulty thermostat, or a problem with the heat pump's electrical system.
If you encounter any issues, it's always best to consult with a qualified geothermal technician. Attempting to repair the system yourself could void the warranty or cause further damage.
FAQs About Geothermal Heating and Cooling
How long does a geothermal system last?
Geothermal systems are known for their longevity. The underground loops can last for 50 years or more, while the heat pump typically lasts for 20-25 years with proper maintenance.
Is geothermal heating and cooling environmentally friendly?
Yes! Geothermal systems are highly environmentally friendly compared to traditional HVAC systems. They reduce reliance on fossil fuels, lower greenhouse gas emissions, and use a renewable energy source.
How much money can I save with geothermal?
Energy savings vary depending on your location, energy prices, and system efficiency, but homeowners typically save 30-70% on their heating and cooling costs with geothermal.
What if I don't have enough land for a horizontal loop system?
A vertical loop system is a great alternative for properties with limited land. It requires less surface area and can be just as efficient.
Can I use my existing ductwork with a geothermal system?
In most cases, yes. A geothermal heat pump can be connected to your existing ductwork, making the installation process more straightforward. However, an installer will need to inspect your ductwork to ensure it's properly sized and sealed for optimal performance.
Making the Switch to Geothermal
Switching to geothermal heating and cooling is a significant investment, but it's one that can pay off handsomely in terms of energy savings, environmental benefits, and increased home value. By understanding the installation process and working with a qualified geothermal installer, you can confidently embark on this journey towards a more sustainable and energy-efficient future. The upfront research and planning will empower you to make informed decisions, ensuring a smooth installation and years of comfortable, cost-effective home energy. You've got this!
Posting Komentar untuk "Step-by-Step Guide to Geothermal Heating and Cooling Installation"